Unboxing
Smoothieboard V1:
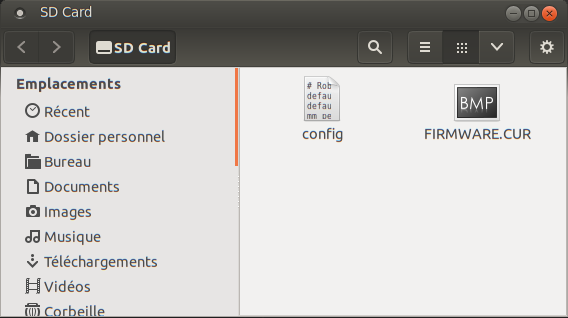
Your Smoothieboard comes with a micro SD card in the microSD slot.
The boards come pre-flashed with the latest firmware.
With a basic configuration file installed on the SD card, no preparation is needed before you can connect Smoothieboard to your computer and start interacting with it.
Smoothieboard V2 Prime:
Your Smoothieboard V2 Prime comes with an SD card (2-8 GB) in the SDIO slot, pre-loaded with firmware and a default configuration.
The boards come pre-flashed with the latest firmware.
With a default configuration file already installed on the SD card, you can connect your board immediately. The V2 also includes an onboard Ethernet port for network connectivity, which is the recommended communication method.
The first thing you might want to do before you start connecting your board is to look at our list of Software, and install a “host” program to talk to the board.
If you don't have a Smoothieboard but have or consider purchasing an MKS board, please make sure you read What's wrong with MKS
Connecting via USB
A good first step is to connect your board to your computer to familiarize yourself with it.
Connect a USB-B cable to the USB connector on the board, and to your computer.
A moment after connection, your computer will recognize the Smoothieboard as a USB Mass Storage Device (like a USB disk-drive or an SD card reader), showing you the files present on the SD card.
Drivers are needed for Windows 7/8, while Linux and Mac OS X directly support the device, you can find those drivers here.
Connect a USB-C cable to the USB connector on the board, and to your computer.
A moment after connection, your computer will recognize the Smoothieboard V2 as a USB Mass Storage Device (like a USB disk-drive or an SD card reader), showing you the files present on the SD card.
USB drivers are typically not needed on Linux, Mac OS X, or modern Windows systems. The SDIO SD card interface provides much faster transfer rates (10-25 MB/s) compared to USB Mass Storage.
This allows you to add, copy, edit, or delete any file you’d like.
Already present on the SD card is a configuration file.
This file is named “config” and contains all of the configuration options for your board in a flat text format.
The file is read when you start or reset your board.
You edit the configuration simply by editing this file in a Text Editor, saving it, and resetting the board.
This file uses INI-style sections (e.g., [actuator], [motion control]) with hierarchical settings.
The file is read when you start or reset your board.
You edit the configuration by editing this file in a Text Editor, saving it, and resetting the board. V2 configuration is structured differently from V1, so refer to the configuration guide for proper formatting.
No need to recompile or flash the board.
It can also be used to store and play G-Code files, see Player.
USB Mass Storage is not the only thing you get when you connect the board.
The board also exposes a USB CDC Serial interface, allowing you to send G-Code and receive answers.
(There is also a DFU interface for flashing firmwares but that’s mostly for developers).
The CDC (Serial) interface is the interface host programs like Pronterface use to allow you to interact with your machine.
If you are already familiar with it, you can try connecting right now and get an answer from the board.
If not, we explain it all later in this guide.
Connecting via the network
V1 Network (Optional):
The Smoothieboard V1 can optionally be connected to an Ethernet network via USB-to-Ethernet adapter or external network expansion.
This allows you to access a web interface the board can serve, and control the machine via your browser.
It also allows you to connect software that supports it (like Pronterface and Visicut) via the network.
Network connectivity is optional and disabled by default, but is easy to enable and configure if you have the appropriate hardware.
V2 Network (Built-in):
The Smoothieboard V2 Prime includes an onboard Ethernet port (RJ45) with integrated PHY, allowing direct connection to your local Ethernet network via standard network cable.
This allows you to access a web interface the board serves, and control the machine via your browser.
It also allows you to connect software that supports it (like Pronterface and Visicut) to your Smoothieboard via the network.
Network is disabled by default but is very easy to enable and configure. It is the recommended primary method of communicating with your V2 Smoothieboard.
You can find all the information you need about using the network interface here: Network interface
Updating your firmware

Before starting, a very good idea is to ensure you have the latest firmware version.
V1 Firmware Update (SD Card Method):
- Download the latest
firmware.binfile - Copy it onto the SD card
- Reset the Smoothieboard
The new firmware will “flash” (you will see the LEDs on the board do a little “dance”), and you will then have the latest version.
This is particularly useful if you ever need to ask for help, as people helping you will be assuming you have the latest version.
You can find the file, and information on how to flash it, at Flashing Smoothie Firmware.
V2 Firmware Update (Multiple Methods):
Method 1: SD Card (Recommended for first update):
- Download the latest
firmware.binfile - Copy it onto the SD card
- Reset the Smoothieboard V2
The new firmware will “flash” (you will see the LEDs on the board do a little “dance”), and you will then have the latest version.
Method 2: Network Update (requires Ethernet): Once you have network configured, you can update directly via the command:
update http://example.com/firmware.bin
This is particularly useful if you ever need to ask for help, as people helping you will be assuming you have the latest version.
You can find the file, and information on how to flash it, at Flashing Smoothie Firmware.