Joystick Module
What is Joystick?
Joystick is a module for SmoothieBoard which adds the ability to use joysticks with your machine.
It is much like the Switch module, but can read from things which output an analog voltage (things like joysticks, sliders, knobs, force sensitive resistors, etc).
Some possible uses for the Joystick module:
- Moving your machine to set up the part origin (see jogging)
- Retracting an extruder on a 3D-printer
- Focusing a laser cutter
- Manually overriding your machine’s speed with a knob/slider (see feed rate override)
- Controlling spindle speed with a knob on a mill
Getting Started
Hardware Requirements
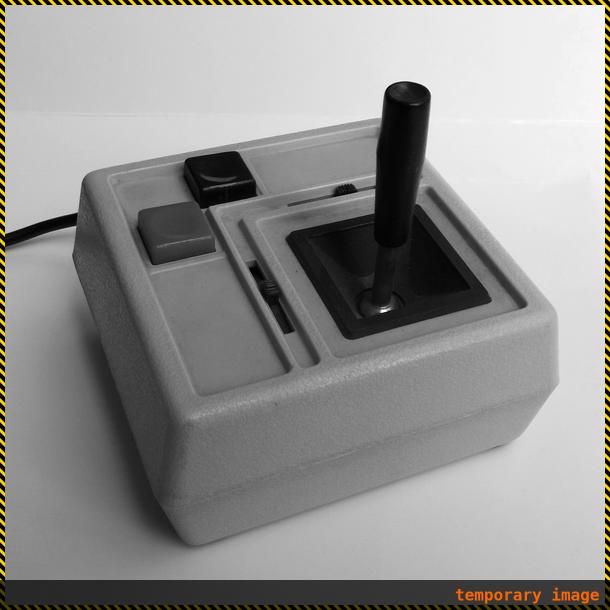
To begin, you will need a device that you want to read. Some example devices are shown here, but really any variable resistor (potentiometer) or device that outputs 0-3.3 V should work.
For more information on how potentiometers work, see SparkFun’s tutorial.
For the rest of the document, the examples will be for a 2-axis joystick like in the right-most picture. This joystick has two separate potentiometers for each axis, and has springs inside to return the knob to the center when released (think PlayStation controller knob).
Connections
If you have a potentiometer, you will need to connect one side to 3.3 V, the other side to ground, and the wiper to a pin on the SmoothieBoard which supports analog reading (see table below).
The above image shows a basic schematic of a potentiometer.
Pins 1 and 3 are the ends of the potentiometer, and Pin 2 is the wiper.
Vin should be 3.3 V for the SmoothieBoard, and Pin 2 will be connected to a compatible pin on the SmoothieBoard (see table below).
The analog pins on the SmoothieBoard which can be connected to a wiper (Pin 2 in above schematic) are shown in the table below:
| Analog Pin | Smoothie Assignment | Comments |
|---|---|---|
| 0.2 | uart0 txd | Not recommended (used for ISP programming of the bootloader and for debugging) |
| 0.3 | uart0 rxd | Not recommended (used for ISP programming of the bootloader and for debugging) |
| 0.23 | hotend.thermistor_pin | Not recommended (used for thermistors and has built-in 4.7 kΩ pull-up) |
| 0.24 | bed.thermistor_pin | Not recommended (used for thermistors and has built-in 4.7 kΩ pull-up) |
| 0.25 | thermistor2 | Not recommended (used for thermistors and has built-in 4.7 kΩ pull-up) |
| 0.26 | thermistor3 | Not recommended (used for thermistors and has built-in 4.7 kΩ pull-up) |
| 1.30 | spare | Recommended pin |
| 1.31 | spare | Recommended pin |
See Pinout for a diagram of the SmoothieBoard with the pins labeled.
For a joystick, you will need to connect each wiper (the left/right and up/down) to different analog pins (e.g. 1.30 and 1.31).

Configuration
Mapping Voltage to Position
The configuration file, at its most basic level, must tell the SmoothieBoard how to convert the 0 to 3.3 V that it reads into a more useful range of numbers. The range that the Joystick module uses is -1 to 1. It is also possible to use a 0 to 1 range if negative values don’t make sense for your application.
The way the Joystick module performs this conversion is to first measure the voltage coming in. The module then subtracts off an offset, called zero_offset. The module then scales the voltage reading so that the zero_offset voltage becomes 0, and the endpoint voltage becomes 1 or -1 (depends on if endpoint is greater or less than zero_offset). Any values which end up outside the -1 to 1 range are fixed to be at +/- 1.
 Example Mapping from joystick position to output with `zero_offset` = 1.5 V and `endpoint` = 0 V
Auto-Zeroing
The joystick module has an optional feature which automatically determines zero_offset.
For a short period of time (startup_time) after the SmoothieBoard is powered on / reset, the joystick module averages the joystick readings. The average value at the end of the startup time is used as the zero_offset.
This feature is useful for joysticks, where the zero_offset is somewhat unknown (it is usually around 1.65 V but different devices have slightly different center values).
It would not make sense to enable for sliders or knobs, since the knob doesn’t have a known/default starting position.
startup_time, otherwise the zero_offset will be wrong and the joystick will have undesirable behavior.
All Configuration Options
Joystick Options
The joystick module allows you to control Smoothie using analog joystick inputs. Below are the configuration options available.
Basic Options
| Option | Example Value | Explanation |
|---|---|---|
joystick.module-name.enable |
true | If true, create and enable a new Joystick module with the name “module_name” |
joystick.module-name.pin |
1.30 |
Which SmoothieBoard pin should be used to read the value. See table above for allowable pins. |
joystick.module-name.refresh_rate |
10 | Sets how many times per second to update the joystick reading |
joystick.module-name.zero_offset |
1.65 | Sets what voltage will map to zero output |
joystick.module-name.endpoint |
3.3 | Sets what voltage will map to +/- 1. If endpoint is greater than zero_offset, it specifies what voltage maps to 1. If endpoint is less than zero_offset, it specifies what voltage maps to -1 |
Auto-Zero Configurations
The auto-zero feature automatically determines the center position of your joystick on startup.
| Option | Example Value | Explanation |
|---|---|---|
joystick.module-name.auto_zero |
true | If true, enables the auto-zeroing feature, which automatically determines the zero_offset |
joystick.module-name.startup_time |
1000 | Sets how long (in milliseconds) after SmoothieBoard resets to obtain readings to average for zero_offset. It must be at least 1000 / refresh_rate, but shouldn’t be too long, otherwise the joystick might be moved during the measurement. |
joystick.module-name.start_value |
0 | Sets the default value of the joystick output during the startup time. Should be between -1 and 1 |
Usage
Jogging
To use the joystick for jogging, configure two different modules with two different names. For example, one module will be called “horizontal” and the other “vertical”. An example config file for the joystick is shown below:
# joystick-2D.config
joystick.horizontal.enable                     true              # enable the horizontal axis joystick
joystick.horizontal.pin                        1.30              # use pin 1.30 connected to potentiometer wiper
joystick.horizontal.endpoint                   3.20              # 3.2 V maps to +1 in joystick reading
joystick.horizontal.auto_zero                  true              # automatically determine the zero point
joystick.horizontal.startup_time               1000              # take readings for 1 second at startup to get auto-zero point
joystick.horizontal.refresh_rate               100               # update the joystick position 100 times per second
joystick.horizontal.start_value                0                 # when auto-zeroing, force joystick output to be 0

joystick.vertical.enable                       true              # enable the vertical axis joystick
joystick.vertical.pin                          1.31
joystick.vertical.endpoint                     3.20
joystick.vertical.auto_zero                    true
joystick.vertical.startup_time                 1000
joystick.vertical.refresh_rate                 100
joystick.vertical.start_value                  0
With the joystick configuration done, you will simply need to configure the Jogger. The only pertinent config for the joystick/jogger connection is setting the data_source_xxx configs for the Jogger. An example of those options is shown below:
# Jogger Configuration
jogger.enable                                  true
jogger.data_source_alpha                       horizontal
jogger.data_source_beta                        vertical
These options tell the jogger the names of the joystick modules to read when jogging.
Feed Rate Override
To use the joystick to override your machine’s feed rate (to go faster or slower while cutting/printing), set up a single joystick axis. An example snippet of the configuration file is shown below:
# feedrate-override.config
joystick.fro.enable                            true              # enable the feed-rate override joystick
joystick.fro.pin                               1.30              # use pin 1.30 connected to potentiometer wiper
joystick.fro.endpoint                          3.20              # 3.2 V maps to +1 in joystick reading
joystick.fro.zero_offset                       0                 # 0 V maps to 0 in joystick reading
joystick.fro.refresh_rate                      100               # update the joystick position 100 times per second
With the joystick properly configured, you will simply need to tell the Feed Rate Override module((Doesn’t exist yet)) which joystick to read:
# Feed Rate Override Configuration
feedoverride.data_source                       fro
Developer Documentation
For information on how to write your own module which uses a joystick, see the joystick developer documentation.