Configuring a Smoothieboard for Linear Delta Kinematics

Linear delta 3D printers use the power of mathematics to move your extruder.
They tend to have less diverse parts, but be more difficult to build correctly.
This page will walk you through how to configure Smoothie to control a linear delta printer, how to tune its different parameters, and how to calibrate them automatically or manually.
What is a Linear Delta?
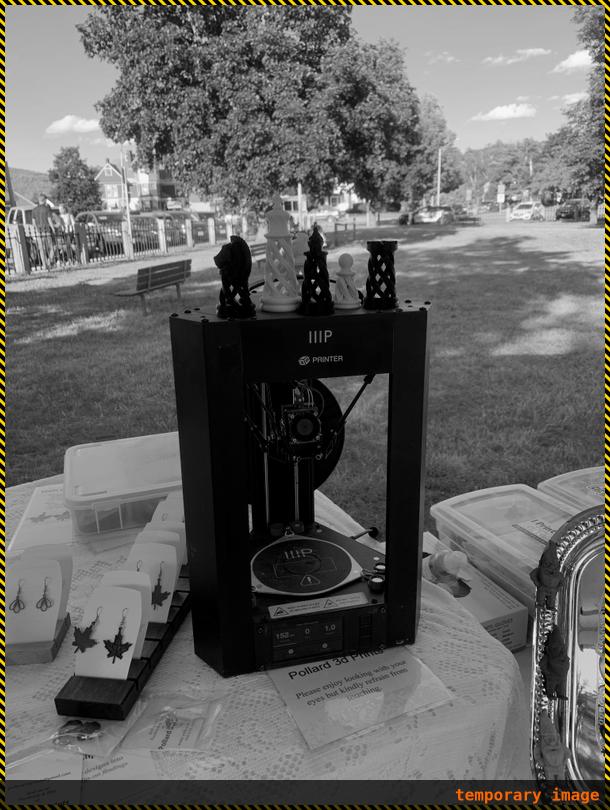
Linear delta machines such as the Rostock and Kossel use three linear axes in a triangular configuration, arms, and some clever math to move a tool in three dimensions.

A typical linear delta 3D printer
They can be quite fast due to the low moving mass, in particular in the Z direction, which is usually slower in typical Cartesian 3D printer designs.
Start with this file!
You can find an example linear delta configuration on GitHub here.
It is strongly recommended you start from this example configuration file instead of modifying the default cartesian configuration file.
Enabling the Arm Solution
To setup your Smoothieboard for control of a linear delta machine, you must select the
This is true for all linear delta type bots - older versions of the firmware included separate configurations for Rostock and Kossel printers, but these have been unified.
To modify your configuration file for a linear delta arm solution, change/add the following:
arm_solution                                 linear_delta
arm_length                                   250.0            # this is the length of an arm from hinge to hinge
arm_radius                                   124.0            # this is the horizontal distance from hinge to hinge when the effector is centered
Base Parameters
Here is a labelled schematic of a normal linear delta:
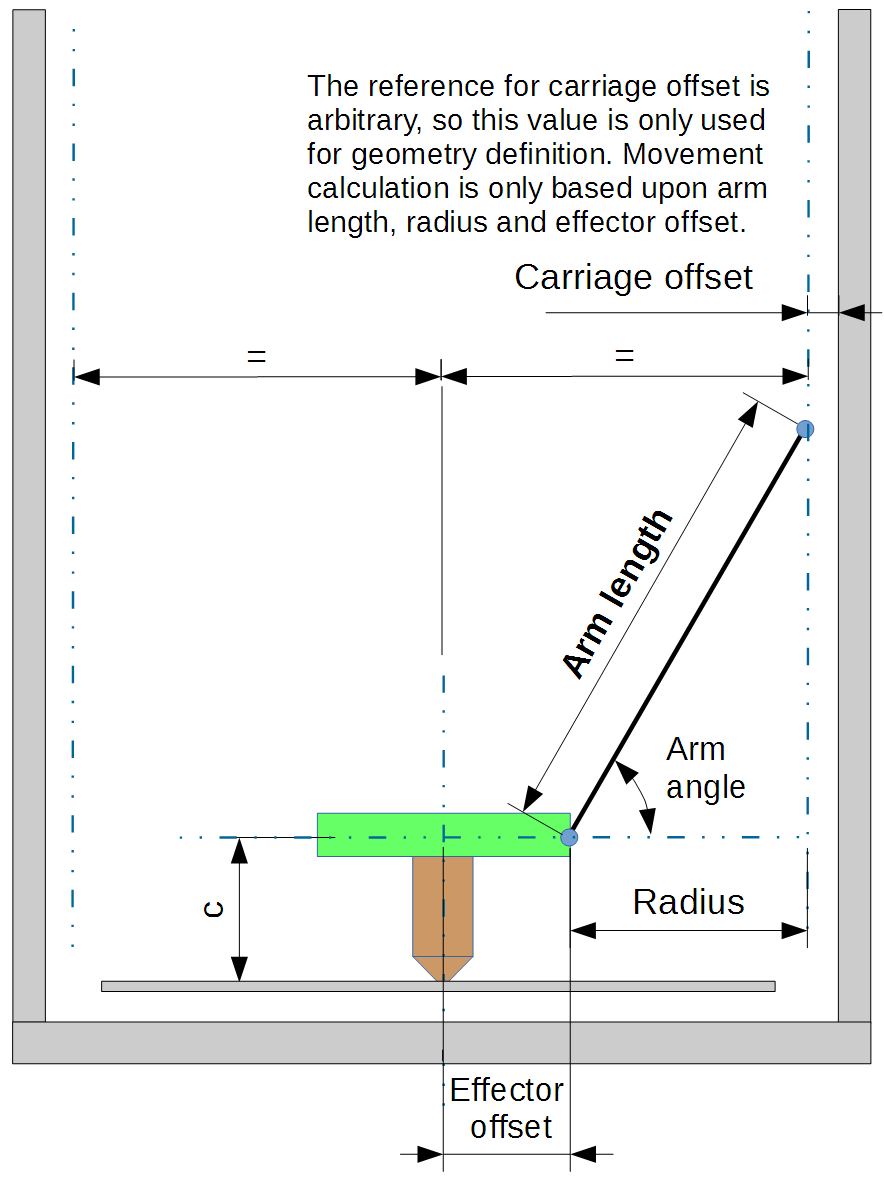
Delta printer geometry and terminology
This shows the basic terminology and structure of delta machines.
The two most important parameters are as follows:
Arm Radius
You need to set
An incorrect value for
Arm Length
Set
An incorrect value for
Critical Construction Notes
These are the two main parameters you must get right for Smoothie to move your extruder around precisely.
Beyond that, precise construction of your delta printer is critical:
- The towers need to be 120° apart and perfectly vertical
- The three arms (including their carriages) must all be the same length to the center of the effector platform
These two parameters correspond to the following in your Marlin configuration:
arm_lengthisDELTA_DIAGONAL_RODarm_radiusisDELTA_RADIUS, which is calculated as follows:DELTA_RADIUS=DELTA_SMOOTH_ROD_OFFSET-DELTA_EFFECTOR_OFFSET-DELTA_CARRIAGE_OFFSET
Homing
The linear delta arm solution is pretty much useless without homing.
Do not try to set up a printer without endstops, and do not try to do anything with your printer before you home it.
Test the endstops with
Here is a generic delta homing configuration:
endstops_enable                              false            # The endstop module is enabled by default and can be disabled here
delta_homing                                 true             # Forces all three axis to home at the same time regardless of what is specified in G28
alpha_min_endstop                            nc               # Pin to read min endstop, add a ! to invert if endstop is NO connected to ground
alpha_max_endstop                            1.25^            # Pin to read max endstop, uncomment this and comment the above if using max endstops
alpha_homing_direction                       home_to_max      # Or set to home_to_max and set alpha_max and uncomment the alpha_max_endstop
alpha_max                                    0                # This gets loaded as the current position after homing when home_to_max is set
beta_min_endstop                             nc               # Pin to read min endstop, add a ! to invert if endstop is NO connected to ground
beta_max_endstop                             1.27^            # Pin to read max endstop, uncomment this and comment the above if using max endstops
beta_homing_direction                        home_to_max      # Or set to home_to_max and set alpha_max and uncomment the alpha_max_endstop
beta_max                                     0                # This gets loaded as the current position after homing when home_to_max is set
gamma_min_endstop                            nc               # Pin to read min endstop, add a ! to invert if endstop is NO connected to ground
gamma_max_endstop                            1.29^            # Pin to read max endstop, uncomment this and comment the above if using max endstops
gamma_homing_direction                       home_to_max      # Or set to home_to_max and set alpha_max and uncomment the alpha_max_endstop
gamma_max                                    300              # This gets loaded as the current position after homing when home_to_max is set

alpha_max_travel                             1000             # Max travel in mm for alpha/X axis when homing
beta_max_travel                              1000             # Max travel in mm for beta/Y axis when homing
gamma_max_travel                             1000             # Max travel in mm for gamma/Z axis when homing

# Endstops home at their fast feedrate first, then once the endstop is found they home again at their slow feedrate for accuracy
alpha_fast_homing_rate_mm_s                  200              # Alpha tower fast homing feedrate in mm/second
alpha_slow_homing_rate_mm_s                  20               # Alpha tower slow homing feedrate in mm/second
beta_fast_homing_rate_mm_s                   200              # Beta  tower fast homing feedrate in mm/second
beta_slow_homing_rate_mm_s                   20               # Beta  tower slow homing feedrate in mm/second
gamma_fast_homing_rate_mm_s                  200              # Gamma tower fast homing feedrate in mm/second
gamma_slow_homing_rate_mm_s                  20               # Gamma tower slow homing feedrate in mm/second

alpha_homing_retract_mm                      5                # Distance to retract from the endstop after it is hit for alpha/X
beta_homing_retract_mm                       5                # Distance to retract from the endstop after it is hit for beta/Y
gamma_homing_retract_mm                      5                # Distance to retract from the endstop after it is hit for gamma/Z
Gamma Max
gamma_max is the height the head is above the bed when homed to the top endstops.
Homing the printer to the endstops establishes your printer’s maximum Z position, as well as establishing the origin of the XY plane.
Ideally, this should also coincide with the exact center of your printer’s physical build surface.
alpha_max and beta_max should be left at 0.
alpha_max_travel, beta_max_travel, gamma_max_travel is the max distance the carriage will travel while homing.
These MUST be set to at least the total height of your towers and NOT the same as gamma_max, usually it is at least twice gamma_max.
Trim
The alpha_trim_mm, beta_trim_mm and gamma_trim_mm settings are a way to tweak endstop positions in software and simplify the process of tramming the effector (making sure that moves in the XY plane remain parallel to the print surface).
The trim values are the distance in millimeters from the point where your endstop is triggered.
If you are migrating a printer from Repetier-Firmware, your endstop offsets are defined in terms of steps for your stepper motors. To convert, divide the number of steps by your steps_per_mm for that axis.
You need to home after setting
Negative values adjust the endstops down by that number of mm. Positive values are up.
When you have found the correct values for your endstop settings (see the suggested workflow near the bottom of this page for one process to adjust the trim values), edit the config file and reboot, or save the
The latest edge now uses soft trim, this allows positive and negative trim values without crashing your endstops.
(Note the old suggestion of adding -5 to all your trim values is no longer valid and will do nothing other than lose 5mm from your build height).
When you home a delta that has non zero trim values, you will find that X and Y are not 0 after homing. This is normal.
If you want X0 Y0 after homing you can set
Arm Parameters
arm_length and arm_radius can be set live using:
M665 L340.0 R240.5
arm_length and R is the arm_radius
NOTE: You MUST do a Home after setting these.
Simply doing:M665
On its own will just report the current settings.
These can also be saved with
Changing arm_radius actually changes the relative height of the center to the edges, so after changing the arm_radius you MUST measure both the outer edges and the center, the center alone will appear to not change.
This is NOT a bug.
A suggested workflow for calibrating arm_radius and gamma_max when you first set up a delta printer would be:
- Home, then adjust
gamma_maxuntil the z-height is correct at the center of the print bed (lightly holding down a sheet of paper). - Re-home, then jog the effector platform near the alpha tower. Adjust
alpha_trim_mmusing M666 or a physical endstop screw, re-home, and repeat until the paper is held down with equal force at Z=0. (tip: you may want to write some G-code snippets to automate this process, or else you may find yourself doing a lot of jogging - sample scripts developed by Gene Buckle (author of the Rostock Max assembly manual) are at the bottom of this page.) - Repeat step #2 to set
beta_trim_mmandgamma_trim_mm(or physical endstop screws) appropriately near the beta and gamma towers. - Re-check the z-height at the center of the bed. If the effector is too high, increase
arm_radiusslightly, and return to step 1 of this sequence. If the effector is too low, decreasearm_radiusslightly, and return to step 1.
Once the z-height is correct, your printer should be well-calibrated. You should not need to re-do these calibration steps unless you change hardware on your printer.
Height Calibration
Your printer homes by “seeking” the endstops at the top.
When that is done, your printer is always at the same position, every time: The Z axis is at its maximal position, and the X and Y axes are at the center of the work area (0,0).
But it doesn’t know how high above the bed it is, unless you tell it.
And it needs to know this, so that when you tell it to go to Z 0 (the bed), it knows how much to move from its position at the Z maximum.
Understanding delta printer coordinates - it's basically a cylinder and you position things around its center
There are several ways to tell Smoothie how high the hotend is from the bed after homing:
Configuring Z height
After homing (with
Because of this, it will read the configuration option
So after homing, the Z position is set to
This means for example if you home to max that if your hotend is 300mm above your bed after homing, and you set
To put it simply, setting
To find the right value for
Simplified manual adjustment method (Recommended method)
First home the machine:
G28
Then move to the point the machine currently thinks is Z 0:
G0 Z0
Then move the head to the bed by jogging, using Pronterface’s arrows, the panel, the web interface or whatever other method is adequate in your case.
Finally issue the
M306 Z0
Then save to the SD card with
M500
Next time you home, the machine will know how high above the bed it is.

Finding gamma_max manually
First home the machine:
G28
Then set the current Z position to 0:
G92 Z0
Then move the head to the bed by jogging, using Pronterface’s arrows, the panel, the web interface or whatever other method is adequate in your case.
Once the head is exactly at the bed, issue this command:
M114
This will return the position of all axes. The current position of the Z axis is the value you must use as your
Now simply edit the configuration file to set this value, and reset the board.
Alternatively (delta only) you can use the
The
Next time you home, the machine will know how high above the bed it is.
Finding gamma_max with a probe
If you have some sort of probe attached to your head ( or below your head ), which triggers when the hotend gets close to the bed, then you can use this to find your gamma_max value without manually jogging.
Now there are two different cases here:
- Either when the probe is triggered, the hotend is exactly at bed level (this is the case of probes under the bed, or probes that trigger when the hotend itself is pushed)
- Or, when the probe is triggered, the hotend is above the bed by a given distance, which we will call the z probe offset (this is the case of servo-retracted probes, bltouch, inductive probes, IR probes, etc).
First home the machine:
G28
Then ask the probe to go find the bed:
G30
This will report the distance traveled by the probe.
Your
For example, if you home, then do
Simply edit the configuration file to set this value, and reset the board.
Alternatively you can use the
The
Next time you home, the machine will know how high above the bed it is.
Automatically finding the bed with a probe
Smoothie allows you to save both the Z height, and the delta calibration data, to the SD card.
This means you do not need to probe every time you start the machine, you only need to do it once, and save the values, which will then stay valid as long as your machine’s geometry doesn’t change.
This means you can have a removable probe that you only connect and attach to the head at the rare occasions when you need it.
However, if for whatever reason you have a fixed ( or retractable ) probe on your head ( or sensors below your bed ), then you might want to automatically probe at the beginning of each print.
To do so, simply change your slicing program’s “beginning of file” G-code sequence, and replace:
G28
with:
G28
G30 Znnn
When nnn is the distance between your probe’s triggering point, and the bed (or probe offset):
The
So for example if your probe triggers when the hotend is 5mm above the bed, do
If you are doing this manually you can save time by jogging the Z to within 5mm of the bed then issue the
Automated Calibration
See ZProbe for how to use zprobe to calibrate a delta.
Here is a common sequence that you may do to auto calibrate the delta for the first time, this need not be repeated unless the bed changes.
; do endstop and delta radius calibration
G32
; Home
G28
; move to 5mm above bed
G0 Z5
; then manually jog down until nozzle is on bed or just traps a sheet of thin paper
; sets the Z homing offset based on current position
M306 Z0
G28
G0 Z1
; check nozzle is 1mm above bed
M500
; saves the results in EEPROM equivalent
Full example configurations (including zprobe) can be found at https://github.com/Smoothieware/Smoothieware/blob/edge/ConfigSamples/Smoothieboard.delta/config
Additional Resources
- See http://minow.blogspot.com/ for more details of manually calibrating a delta and how to adjust for dimension errors
- See here if you are curious what automatic delta calibration looks like
Manual Calibration
This process will allow you to manually calibrate your delta printer:
-
Set
gamma_maxso the 0 position in Z is 20mm above the bed. See gamma_max. -
Home, with
G28 . -
Point A: Move to a point at the edge of the bed, in front of the X (alpha) tower.
-
Get the head set just right at the 0 position (so that a piece of paper can just slide between the hotend and bed plate).
-
Do
M306 Z0. -
Home again, with
G28 . -
Repeat the same process (go back to Point A), and check it produces the same results.
-
Point B: Move to a point at the edge of the bed, in front of the Y (beta) tower.
-
Tune the Y (beta) endstop offset value by entering
M666 Ynnn wherennnis the distance between the hotend and bed at this point. -
Home the machine with
G28 -
Go back to point B, and keep this loop until the height is perfectly adjusted, and the hotend always touches the bed at this point.
-
Point C: Move to a point at the edge of the bed, in front of the Z (gamma) tower.
-
Tune the Z endstop offset value by entering
M666 Znnn wherennnis the distance between the hotend and bed at this point. -
Home the machine with
G28 . -
Go back to point C, and keep this loop until the height is perfectly adjusted, and the hotend always touches the bed at this point.
-
Now that all three towers’ endstop offsets are tuned, save them with
M500 . -
Test the height is now the same at the three points as it is at the center, if it is not, Adjust your arm radius with
M665 Rnnn. -
Continue adjusting arm radius until the three points and the center of the bed are all at the same height.
-
Finally, go to the center of the bed, move the head until it touches the bed, and issue
M306 Z0. -
Save all your new settings with
M500 .
If this is too much work, use the automated calibration which does exactly that procedure automatically. (Except for the Z height which you still need to do after calibration). See the zprobe documentation page.
Manual Calibration Scripts
The following scripts were written for a Rostock Max (280mm diameter bed).
If your printer’s bed is much larger or smaller than that, adjust the X/Y parameters in each script as needed to put the effector near each tower (so that one arm is nearly vertical).
These scripts can be copy/pasted repeatedly into a terminal window, or run from your host program of choice (Pronterface, Repetier-Host, Octoprint, etc.)
Script 1: Center of bed
G28
G0 Z0 F3500
Script 2: Alpha tower
G28
G0 Z0 X-77.94 Y-45 F3500
Script 3: Beta tower
G28
G0 Z0 X77.94 Y-45 F3500
Script 4: Gamma tower
G28
G0 Z0 X0 Y90 F3500
Manual Calibration Video Tutorial
Here’s a manual calibration tutorial video:
Advanced Settings
The following settings can be set in the config, or via
They are used to compensate for a frame that is not perfectly aligned. It is recommended the frame be fixed rather than using these to compensate.
Generally speaking adjusting any of these to anything other than 0.0 will fix one thing but throw another thing off.
NOTE: These are usually used with an offline program that calculates the values by doing some form of error minimization.
delta_tower1_offset
delta_tower2_offset
delta_tower3_offset
delta_tower1_angle
delta_tower2_angle
delta_tower3_angle
Alternatively, the values can be changed live (and saved with
M665 Axxx Bxxx Cxxx Dxxx Exxx Hxxx
Where:
- A is delta_tower1_offset
- B is delta_tower2_offset
- C is delta_tower3_offset
- D is delta_tower1_angle
- E is delta_tower2_angle
- H is delta_tower3_angle
Source Code
For developers or those interested in the implementation details, the Linear Delta solution is implemented in:
The source code contains the kinematic equations used to convert between Cartesian coordinates and delta tower positions.
See Also
- Arm Solutions - Overview of all arm solution types
- Rotary Delta - Alternative delta design with rotating joints
- Cartesian - Standard Cartesian configuration
- ZProbe - Automatic bed leveling and calibration
- Delta Calibration Strategy - Automated delta calibration
- Motion Control - General motion control configuration