Stepper Motors
A bit of theory:
« A stepper motor (or step motor) is a brushless DC electric motor that divides a full rotation of the motor into a number of equal steps. The motor’s position can then be commanded to move and hold at one of these steps without any feedback sensor (an open-loop controller). » (Wikipedia)
Because they work by steps, and you can accurately control how many steps you move in each direction, stepper motors are a very practical way of moving things to a desired position. This makes them great for most CNC applications.
Smoothie comes with stepper motor drivers designed for bipolar stepper motors, with a maximum current rating of 2 Amps.
There is a very wide variety of stepper motors around. Bigger motors are generally more powerful.
For a given size, motors will have different torques, max speeds, and different capacities to maintain torque as speed increases. It is important you choose the right motor for your application.
The most common mistake is to choose a high inductance motor.
There are two main "families" of motors out there: high inductance motors are mostly designed for maintaining position and moving rarely (like on a telescope mount), and low inductance motors are designed for moving often, and at high speeds (like on a CNC mill or 3D printer).
If you use a high inductance stepper motor with a Smoothieboard (or any "CNC" stepper motor driver), not only will you get bad speed/torque performance, but when moving the stepper motor (or axis) by hand, very high voltage will be generated, which can destroy your stepper motor driver.
You can recognize a "high inductance" stepper motor by the fact that it's rated inductance is high, in general higher than
10mH is bad.
If your motor doesn't tell you its inductance, rated voltage is also an indication: high inductance stepper motors usually have high rated voltages, a typical value being
12V, where "CNC" steppers have voltage below 5V.
This is not what you want, you want a low inductance stepper motor, with an inductance ideally below 10mH, and a rated voltage ideally below 5V.
The reprap community defines a good stepper motor like this: Ideal stepper is (for reprap printers and similar small CNC using microstepping drivers on 12-24v supply) NEMA17 size, rated 1.5A to 1.8A or less, 1-4ohm winding resistance, 3 to 8 mH, 62oz.in (0.44Nm, 4.5kg.cm) or more of torque, 1.8 or 0.9 degrees per step (200/400 steps/rev respectively), for example the kysan 1124090/42BYGH4803 or the rattm 17HS8401 or Wantai
See: Stepper motor wiring - Be careful you get the coils right.
Wiring
Direct wiring
Bipolar stepper motors have two poles (bi-polar). Each pole is connected to two wires. That’s 4 wires coming out of your stepper motor. These have to be connected to your Smoothieboard.
Each stepper motor driver on the Smoothieboard has 4 connections to that effect. (Stepper motor drivers are labeled M1, M2 etc…)
The tricky thing is often to find out which wires connect to which poles. If you just wire things at random, you have a chance it will work, but let’s be scientific about it. Several methods:
- Documentation: Look at your motor, find its part number. Then google it. If you are lucky, you will find a schematic or a data-sheet that will indicate which wire goes to which pole. Note the colours that correspond to each coil.
- Fingers: When the two wires for a given pole touch together, a closed circuit for that pole is created. This makes the stepper motor more difficult to turn. You can use that effect to discover the poles. Turn the stepper motor shaft, it should turn freely. Now take two wires, and make them touch. Turn the shaft again. If it shows resistance, is harder to turn, you found a pole. If it doesn’t, keep one wire, and try another one for the second one. Do this until you find a combination that shows resistance. Once you find the two wires for a given coil, the other two wires are simply the other coil. Note the colours that correspond to each coil.
- Multimeter: Configure your multimeter to read resistance. Then the method is the same as the previous one, take two wires at random, test them, except you know you find a coil when you measure electrical resistance between two wires. If you measure no contact, try another wire combination. Note the colours that correspond to each coil.
Now to connect the wires to the Smoothieboard. Let’s call one coil A, and the other coil B. It doesn’t matter which is which. Polarity also doesn’t matter, all it changes is the direction the motor turns, and you can change that in the configuration file. Now simply connect your two wires to the Smoothieboard’s 4 pins for that stepper motor driver as such: AABB or BBAA. Other combinations like ABBA or ABAB will not work.
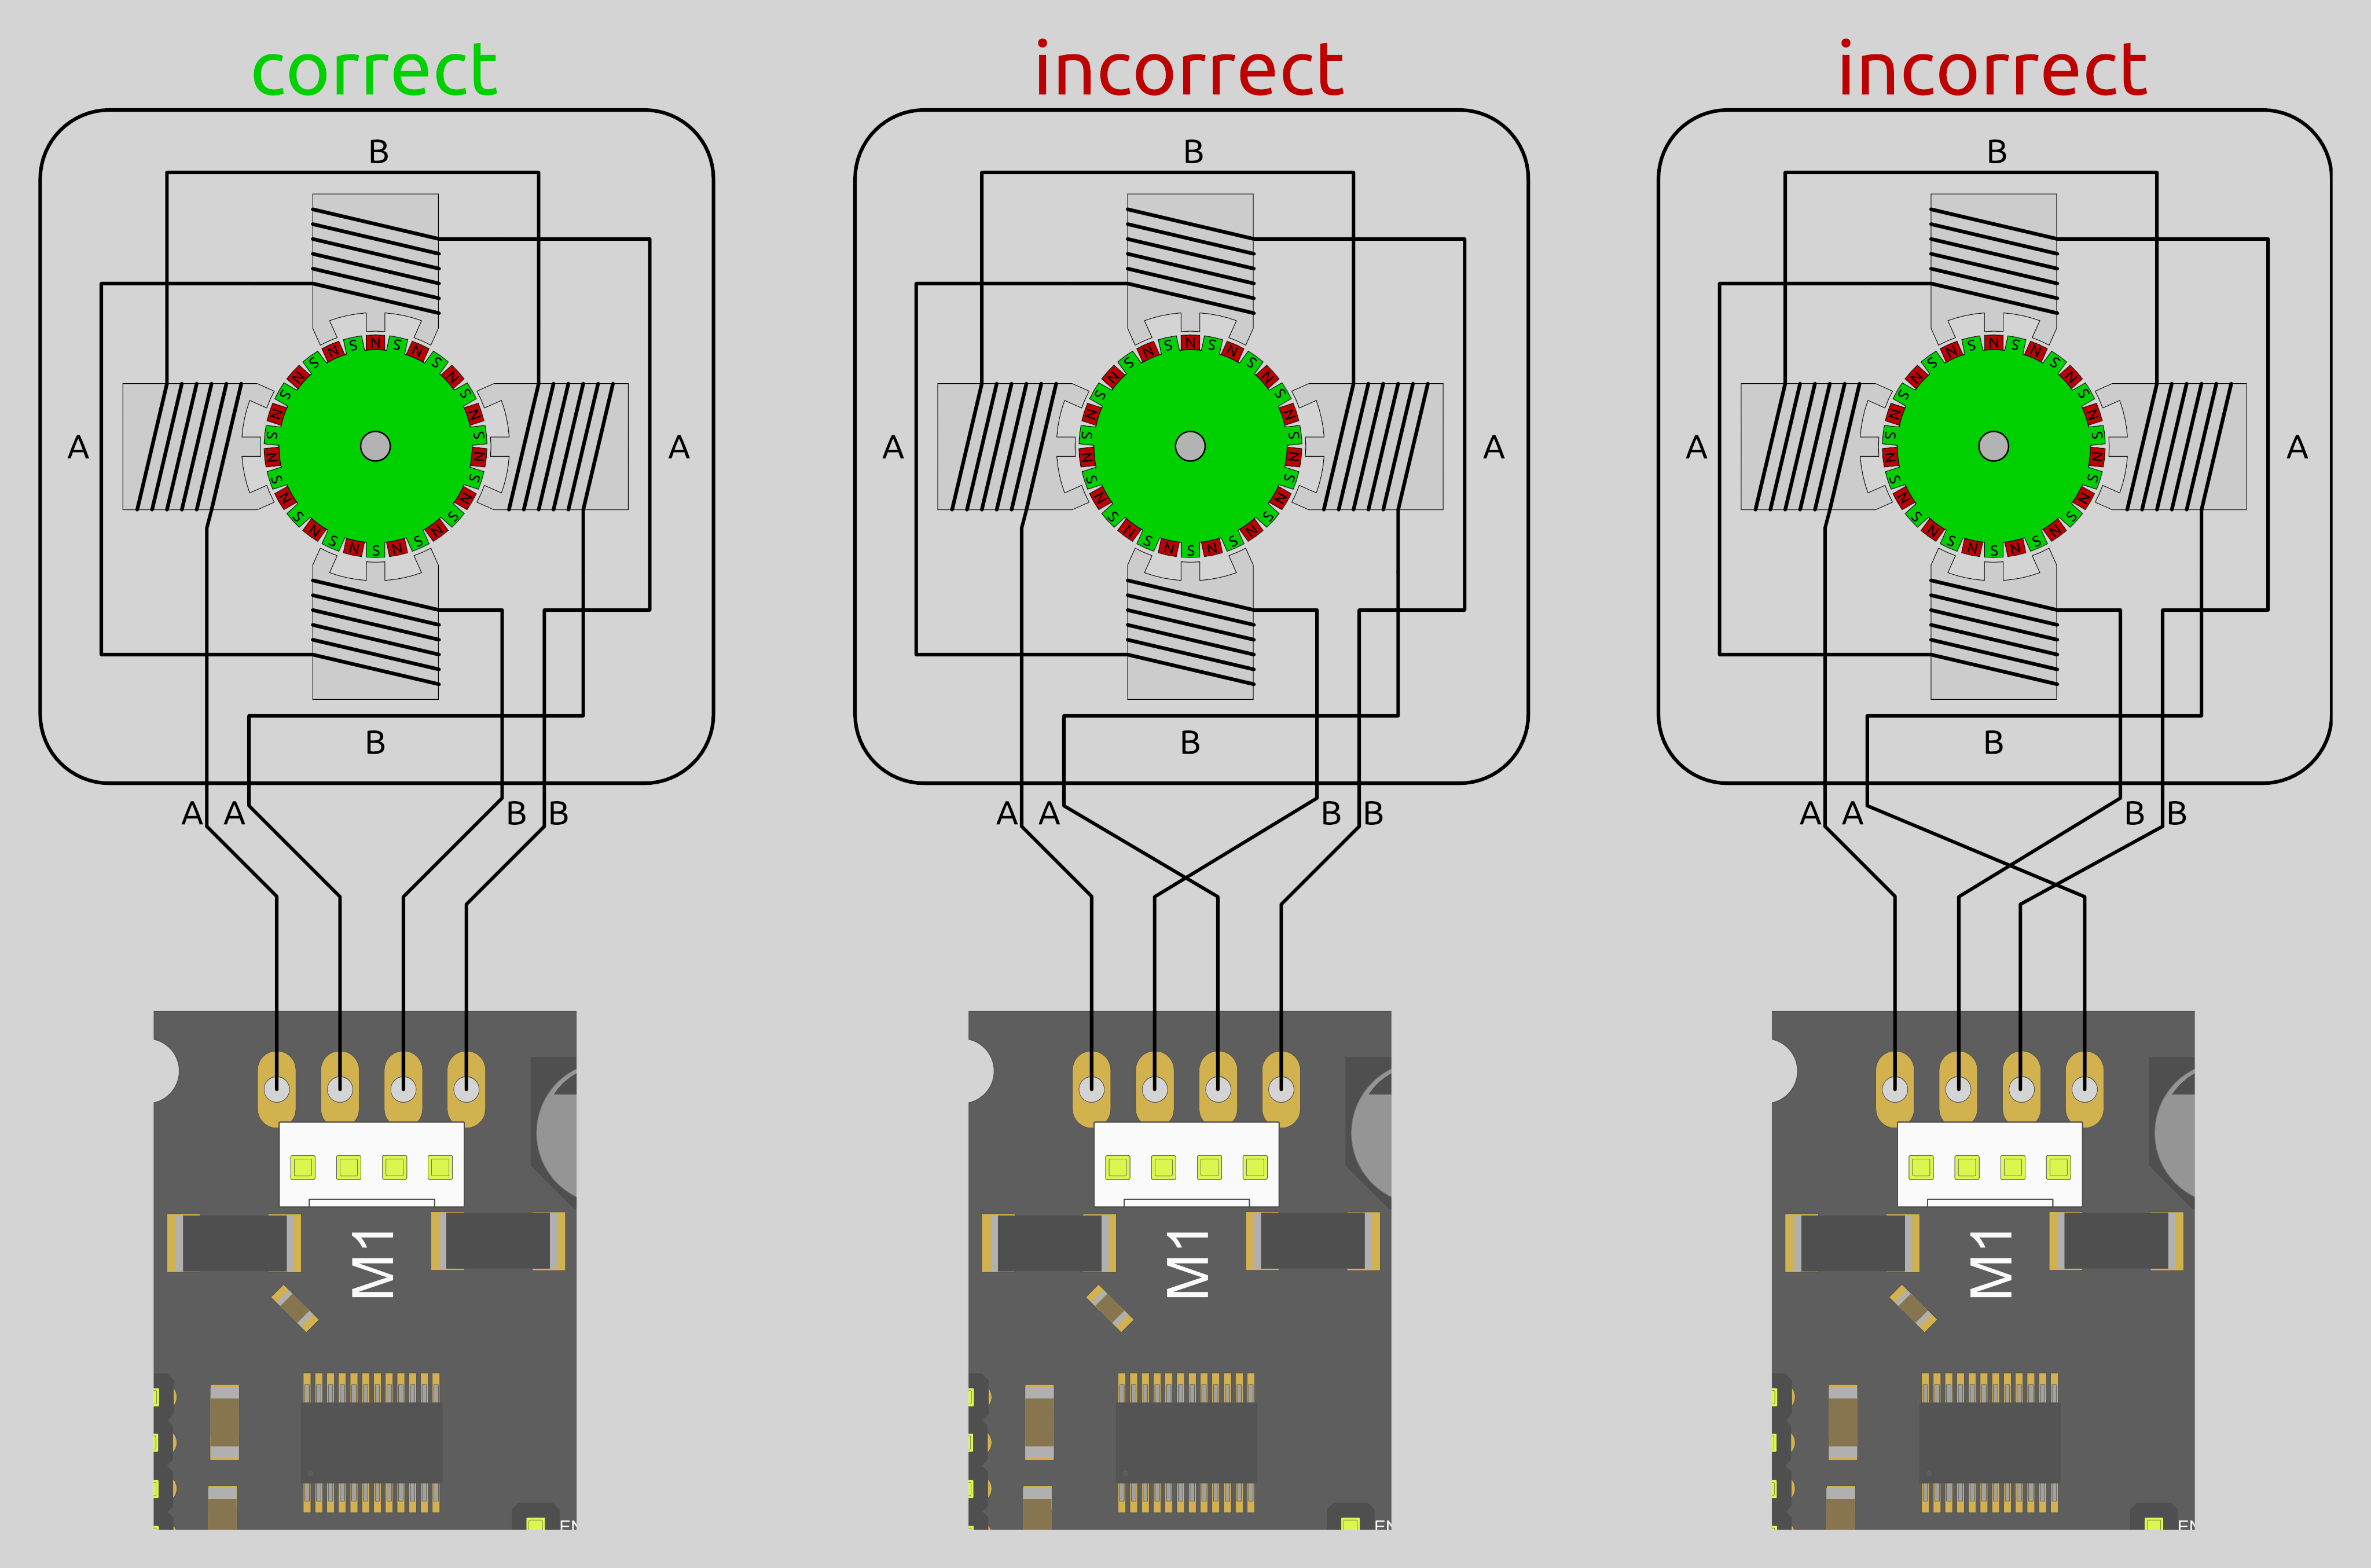
If you don't get it right, it won't work properly
Once your stepper motor is properly connected to your Smoothieboard, it is ready to be controlled.
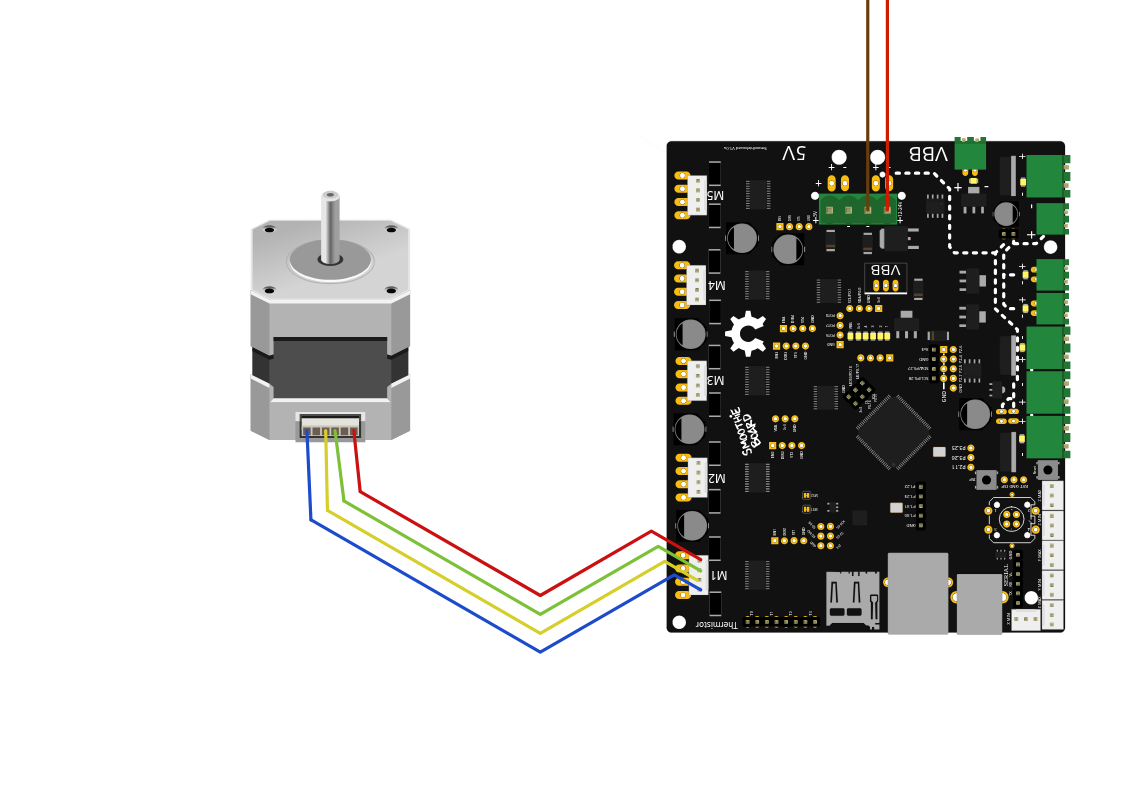
In this example, a stepper motor is connected to the M1 driver, and power is provided to VBB (the main power input).
External Stepper driver
If you want to use larger stepper motors than the Smoothieboard’s drivers can handle (2A max), you need to use external stepper drivers.
You can find detailed information on how to wire an external stepper motor driver to a Smoothieboard in the External driver appendix.
Configuring
Example configurations are available on GitHub.
You can also refer to the Configuration documentation.
Current
The first thing you have to do is tell the stepper motor drivers what is the current rating for your stepper motors is. To drive the stepper motor correctly, the driver has to know the motor’s current rating.
Each stepper motor model has a precise current rating. You can drive your stepper motor at a lower current, which will make it more silent, but also less powerful. But you cannot drive the motor at a higher current than it is rated at. This would cause overheating, and possibly skipped steps.
The rating is often written on your stepper motor’s label (see picture on the right). If it is not, you can get it by googling the stepper motor model number, or by contacting your seller or manufacturer.
Once you have the correct rating, you can set the corresponding parameter in the configuration file.
Smoothie has a funny way of naming stepper motor drivers. Instead of naming them X, Y or Z, because this makes no sense in non-cartesian robots like delta robots, we name the drivers using Greek letters so they are arm application agnostic:
| Label on the Smoothieboard | Axis in a Cartesian machine | Greek letter | Current setting configuration option |
|---|---|---|---|
| M1 | X (left-right) | α (alpha) | |
| M2 | Y (front-back) | β (beta) | |
| M3 | Z (up-down) | γ (gamma) | |
| M4 | E0: First extruder | δ (delta) | |
| M5 | E1: Second extruder | ε (epsilon) |
Now, as described in the “Unboxing” paragraph, connect the board to your computer, open the “config” file with a text editor, and change the configuration value for each stepper motor driver to the correct value.
For example, if your alpha stepper motor has a current rating of 1.68A, edit the corresponding line to read:
alpha_current 1.68 # X stepper motor current
[current control]
alpha.current = 1.68             # X stepper motor current
Do this for each stepper motor you have to connect to the board. (If you have a Cartesian robot, see which motor connects to which stepper driver in the array above. If you use another type of arm solution, see the specific documentation.)
Steps per millimeter
A stepper motor driver operates in steps. It moves a certain number of steps in one direction, then a certain number of steps in another. You think in millimeters. You want your machine to go to a certain position in millimeters, then another position in millimeters.
You need Smoothieboard to convert the millimeters you ask of it, into steps the stepper motor driver understands.
That conversion depends on your exact arm solution. The most common, and the simplest, is the Cartesian arm solution, and it is the one we will focus on here. Documentation for other arm solutions can be found separately.
In the case of a Cartesian arm solution, you simply convert a certain number of millimeters to a certain number of steps. That is the
To compute it, you must multiply a certain number of factors.
- The object you move moves a certain number of millimeters for each rotation of the stepper motor. (This depends on the characteristics of the belt/pulley, or lead-screw system you are using.)
- The stepper motor moves a certain number of full steps per rotation. That is usually 200. (But it can be 400.)
- Each step is divided by the stepper motor driver into a certain number of microsteps. It is that number, and not the number of full steps, that we want. Smoothieboard V1.1 always divides steps into 32 microsteps. (16 for older smoothieboards).
The formula is as follows:
steps per millimeter = ((full steps per rotation) x (microsteps per step)) / (millimeters per rotation)
To help you, there is an awesome calculator by the awesome Josef Prusa: http://calculator.josefprusa.cz/
Once you know the correct value for a given stepper motor driver, set it in the config file.:
alpha_steps_per_mm 80 # Steps per mm for alpha stepper
[actuator]
alpha.steps_per_mm = 80               # Steps per mm for alpha stepper
Do this for each stepper motor driver.
In the case of your extruder stepper motor, the principle is the same, but the value is
Here is a good video on steps per millimeters:
Direction
It is now time to test your stepper motors. For this, you will need to use host software like Pronterface or the web interface.
Now connect to your Smoothieboard over the serial interface. Power your machine on by plugging the PSU into the wall.
Now you need to move an axis to make sure the stepper motor is turning in the right direction. In Pronterface, click near the yellow arrow marked “+X”.
Your X axis will move. If it moved to the right, great! Everything is fine, and you have nothing to change. If it moved to the left, you need to invert the direction of that axis.
You do this by editing the configuration file, and inverting the direction pin for that stepper motor driver:
alpha_dir_pin 0.5 # Pin for alpha stepper direction
Becomes:
alpha_dir_pin 0.5! # Pin for alpha stepper direction
[actuator]
alpha.dir_pin = 0.5              # Pin for alpha stepper direction
Becomes:
[actuator]
alpha.dir_pin = 0.5!             # Pin for alpha stepper direction (inverted)
This is for your axes. In the case of your extruder, the config value is
Save the config file, reset the Smoothieboard, connect again using Pronterface. Now the axis will move in the right direction.
Do this for each axis.
If you have a moving bed in the Y axis for example, as opposed to a moving tool, be careful: what matters is the direction of the head relative to the bed, not the direction of the bed relative to the machine.
It's very common to get confused and invert your Y axis on moving bed machines (or not invert it when it should be).
Basically, if an asymmetrical object looks like the model when it is printed, then your Y axis is correct, otherwise you need to change your configuration.