Smoothie Kill Button
There are two solutions for implementing a kill button on the Smoothieboard:
LED Tactile Button
Solder an LED Tactile Button on the Smoothieboard.
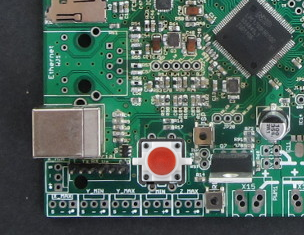
Simple Button
Wire a simple button on two pins.

The button may be configured as a kill switch, which will halt all operations, turn off heaters, and pause the host. It can be cleared with a
kill_button_enable                        true             # set to true to enable a kill button
kill_button_pin                           2.12             # kill button pin. default is same as pause button 2.12 (Add ^ for external buttons)
[kill button]
enable = true                # set to true to enable a kill button
pin = 2.12                   # kill button pin (Add ^ for external buttons)
When in the halted state (after the kill button is pressed), the play LED will flash rapidly. The kill state can be cleared by holding down the kill button for 2 seconds or more.
Alternatively, a latching E-Stop button can be hooked up to the kill button header (usually normally open). Then use this config:
kill_button_toggle_enable true # allows for latching estop button
[kill button]
toggle_enable = true         # allows for latching estop button
When the E-Stop button is hit and latched on, it will halt the system. When it is unlatched and released, the system will exit the halt condition.
If you do not want the halt to exit when it is released, then set this:
unkill_enable false # do not unkill when button held or released
[kill button]
unkill_enable = false        # do not unkill when button held or released
Stopping Smoothie
There are several different ways to stop Smoothie during operation, each with different behaviors and use cases.
Understanding these methods is important for safe operation and troubleshooting.
Stop Methods Comparison
| Command | G-code | Movement | Heaters | File playing | Recoverable | Documentation |
|---|---|---|---|---|---|---|
| abort | Stops SDCARD print immediately | Not affected | Aborts | Position maintained, file must be restarted | Player | |
| suspend | Stops once queue is empty | Turned off (if option enabled) | Paused, can be resumed | Yes, with resume or |
Player | |
| Kill button | Stops instantly (if button), waits for buffer (if host) | Turned off | Aborted | No, position lost, home required | supported-g-codes | |
| Control-X | - | Stops instantly, works during streaming | Turned off | Aborted | No, position lost, home required | - |
Detailed Method Descriptions
Abort Command (abort / M26)
Stops the execution of a file being played from SDCARD.
Behavior:
- Completes the current G-code
- Stops immediately after that
- Discards the rest of the queued commands
- Attempts to maintain the correct position after the abort
- Heaters remain at their current state
Use Case: Quick stop of a print job while preserving position and keeping heaters on.
Recovery: Position is maintained, but the file must be restarted from the beginning.
Documentation: Player module
Suspend Command (suspend / M600)
Suspends the execution of a file being played from SDCARD or being streamed from a host.
Behavior:
- Stops once the movement queue is empty
- All state is saved
- Heaters turned off by default (configurable)
- Jogging and extruding are allowed during suspension
- Can be resumed with resume or
M601
Use Case: Mid-print filament change or filament out detection.
Host Support: Requires upstream support. Currently Pronterface and OctoPrint support it. Other hosts need to be manually paused.
Recovery: Yes, fully recoverable with position maintained.
Documentation: Player module
Kill Button / M112
Emergency stop that instantly halts all operations.
Behavior:
- If kill button pressed: Stops instantly
- If
M112issued from host: Has to wait for the receive buffer to have room - All heaters turned off
- File playing aborted
- Position is lost
- System enters Halt state until
M999is sent
Use Case: Emergency situations requiring immediate stop.
Recovery: No, position is lost. Homing will be required.
Documentation: Supported G-codes, Kill Button
Control-X
Sends a control character to stop Smoothie instantly.
Behavior:
- Works at any time, even when streaming
- Same effect as the kill button
- All heaters turned off
- File playing aborted
- Position is lost
- System enters Halt state until
M999or$Xis sent
Use Case: Emergency stop from terminal/console when streaming G-code.
Recovery: No, position is lost. Homing will be required.
Halt State
When the kill button is pressed (or there is a temperature fault, M112 is issued, a limit switch is hit, or other error), the system enters the Halt state.
Halt State Behavior
- Play LED flashes
- Any command issued from host gets a
!!response (with a few exceptions) - PSU may be turned off if a PSU Switch is defined
Clearing Halt State
The Halt state can be cleared by:
- Issuing
M999from the host - Holding the flashing kill button for 2 seconds
- Using the LCD panel (if equipped)
Using Buttons and Sensors
Best Practices
For Normal Operation
- Use suspend/resume (
M600/M601) for planned interruptions like filament changes - Use abort when you need to stop quickly but keep heaters on
For Emergencies
- Use the kill button or Control-X for immediate emergency stops
- Remember that position will be lost and homing will be required
Recovery After Emergency Stop
- Clear the Halt state with
M999 - Home all axes before attempting further movement
- Check that heaters are at safe temperatures before proceeding
- Verify machine state before resuming work
Further Reading
- Player module documentation
- Kill Button setup
- Switch module - For configuring buttons and sensors
- Supported G-codes
- Power Supply Control - PSU shutdown on halt