( See also Smoothiebox Guide )
SmoothK40 Guide

You want to use proper software to drive your Laser machine, this is the best reason to change for a Smoothie board, and start to use your laser cutter as simply as an inkjet printer.
Smoothie guide for K40
by Stephane BUISSON (Oct/Nov 2015)
Understanding Your Power Supply
Before you get started you should have a look into your laser power supply.
There are different models and types out there and the wiring would vary accordingly.
I will look at 2 common cases:
Laser fire on L or on IN.
The best way to find out your case is to look at how your original wiring was in the factory state.
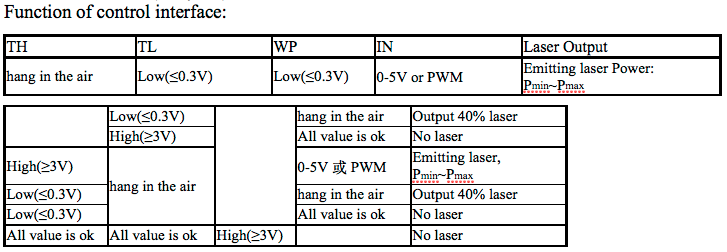
PSU Connection Requirements
To fire the PSU will need to satisfy several conditions, materialized by corresponding connections.
PSU could label them differently ex: (G,P,L,G,IN,5v ), (TH,TL,WP,G,IN.5V ), (K+,K-,etc…)
- Door switch
- Laserswitch
- Test switch (L, fire laser)
- IN (PWM or pot return)
Conditions for a recent PSU (not my case)
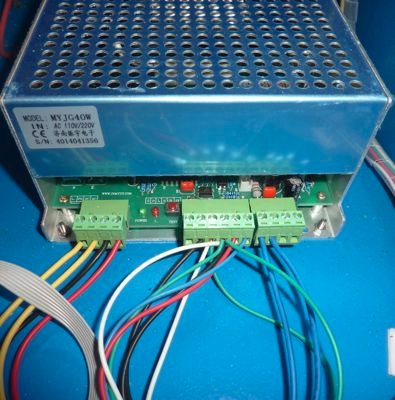
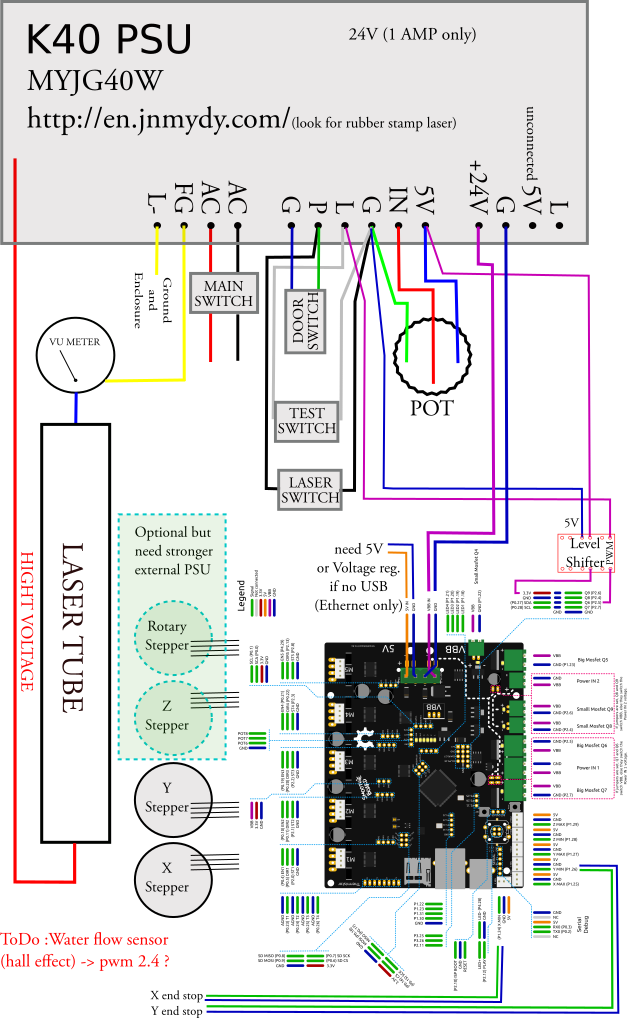
Personally, I got a MYJG40W from jnmydy.com and I can’t find any manual for it. (don’t speak Chinese)
But I made it work with this schema:
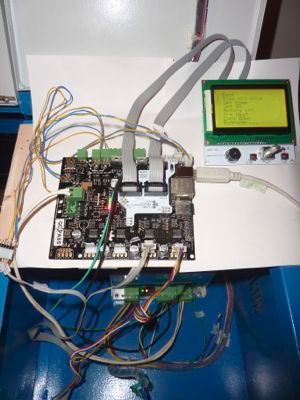
Connecting Endstops and Motors
From the factory, I identified 2 original wirings, very similar.
Flat connector (CN3) or cables (CN21 CN22 CN4) doing the same thing.
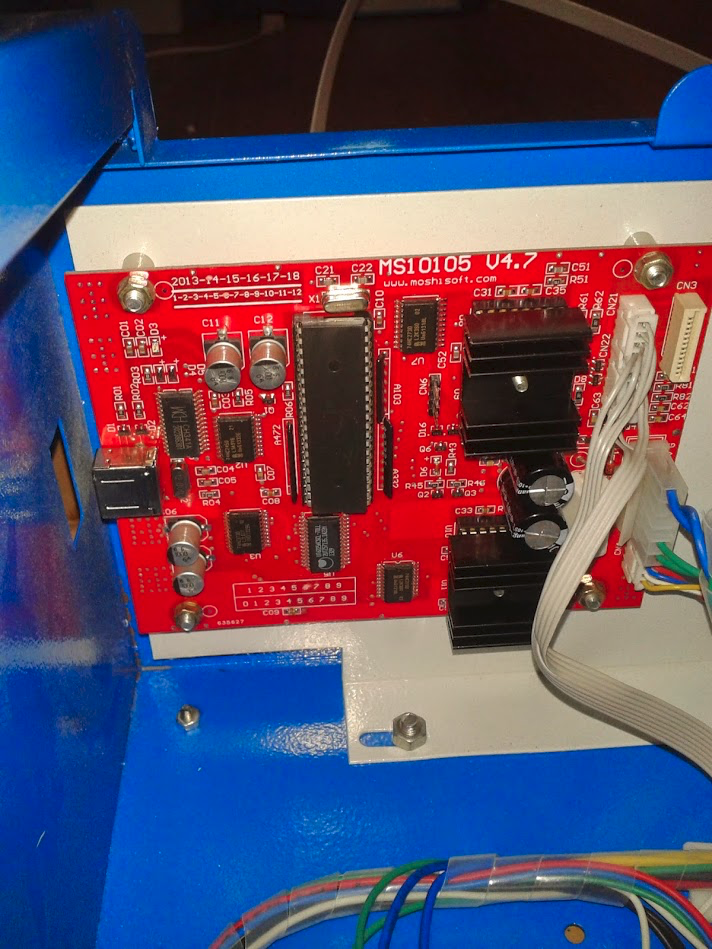
You need to play with a controller to find out your wiring on the flat cable.
or
CN4 is your X motor (plug directly onto Smoothieboard 4XC alpha motor)
CN21 is your Y motor (plug directly onto Smoothieboard 4XC beta motor)
CN22 is your limit switches (X,Y, shared ground) extension cable to be made for connection onto Smoothieboard 4XC min end switches.
(Blue lines were 24V & Ground, Green lines were Fire laser & Ground)
This is simple and very straightforward.
No need to touch the front panel wiring (pot, switches, Vu meter).
Level shifter
Smoothie board Pin
LCD
Not compulsory, but handy to have to display your IP (dhcp), to home or jog the head, and print from SD.
Needs its own voltage regulator for readable contrast.
The limited 30 cm cables length for the display make it delicate to install the LCD on the front panel, but it’s doable.
Motors
Identify your motors, and check their specs (max current).
Find the datasheet for your motors and their current max. (K40 is fitted with all sorts of motor ref.)

X Motor (double-sided shaft) 17HA507H-22P3
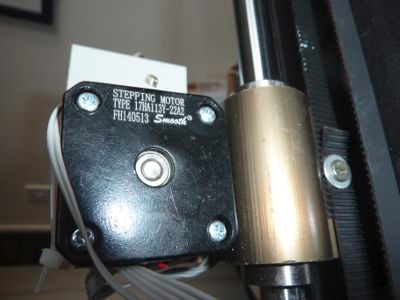
Y Motor 17HA113Y-22A2 FH140513
And you are ready to implement the Smoothie config file.
Config
The section you want to update are:
- Motors max current
- Laser fire on the right PIN (PWM, could be inverted with
!) - Activate laser on the right PIN (equivalent to laser switch, and if applicable to your PSU, digital not PWM)
- Steps per mm accordingly to your measurements (I suggest doing several straight lines, measure them with caliper and make average (for precision reading) for X &Y)
- Network following your specs.
Microstepping Capabilities
Smoothie v1 boards support up to 1/32 microstepping on their stepper drivers. This provides good resolution for most laser cutting applications. The default microstepping setting is typically 1/16, which balances smoothness and performance.
Smoothie v2 boards with TMC2660 or TMC2590 drivers support up to 1/256 microstepping, providing significantly finer resolution than v1. This can result in smoother motion and more precise positioning, particularly useful for detailed engravings. The TMC drivers also offer features like StealthChop for quieter operation and SpreadCycle for better torque control.
My Configuration Example
In my case:
Changes in config are:
- Alpha & beta steps per mm (157.575)
- Max stepper current (0.6 & 0.5)
- Laser (module enable true, pin2.5! inverted)
- LCD (true)
- Network (enable true, added line for network hostname SmoothK40)
# Arm solution configuration: Cartesian robot. Translates mm positions into stepper positions
alpha_steps_per_mm                           157.575               # Steps per mm for alpha stepper (based on my measurements)
beta_steps_per_mm                            157.575               # Steps per mm for beta stepper
gamma_steps_per_mm                           1600                  # Steps per mm for gamma stepper
# Stepper module pins (ports, and pin numbers, appending "!" to the number will invert a pin)
alpha_step_pin                               2.0                   # Pin for alpha stepper step signal
alpha_dir_pin                                0.5!                  # Pin for alpha stepper direction (inverted with `!`)
alpha_en_pin                                 0.4                   # Pin for alpha enable pin
alpha_current                                0.6                   # X stepper motor current
alpha_max_rate                               30000.0               # mm/min

beta_step_pin                                2.1                   # Pin for beta stepper step signal
beta_dir_pin                                 0.11                  # Pin for beta stepper direction
beta_en_pin                                  0.10                  # Pin for beta enable
beta_current                                 0.5                   # Y stepper motor current
beta_max_rate                                30000.0               # mm/min
…
# Laser module configuration
laser_module_enable                          false                 # Whether to activate the laser module at all. All configuration is
                                                                  # ignored if false.
laser_module_pin                             2.5!                  # this pin (connect to PSU IN) PWM to control the laser. Only P2.0 - P2.5, P1.18, P1.20, P1.21, P1.23, P1.24, P1.26, P3.25, P3.26
                                                                  # can be used since laser requires hardware PWM
laser_module_maximum_power                   1.0                   # this is the maximum duty cycle that will be applied to the laser (Potentiometer like)
laser_module_tickle_power                    0.0                   # this duty cycle will be used for travel moves to keep the laser
                                                                  # active without actually burning
laser_module_pwm_period                      20                    # this sets the pwm frequency as the period in microseconds
# Network settings
network.enable                               true                  # enable the ethernet network services
network.webserver.enable                     false                 # enable the webserver
network.telnet.enable                        false                 # enable the telnet server
network.ip_address                           auto                  # use dhcp to get ip address
network.hostname                             SmoothK40             # Some DHCP servers accept a hostname for the machine, allowing you to connect with hostname instead of IP
# uncomment the 3 below to manually setup ip address
#network.ip_address                           192.168.3.222         # the IP address
#network.ip_mask                              255.255.255.0         # the ip mask
#network.ip_gateway                           192.168.1.254         # the gateway address
#network.mac_override                         xx.xx.xx.xx.xx.xx     # override the mac address, only do this if you have a conflict

Command: tracing (
Laser G-code Examples
Understanding basic laser-specific G-code commands will help you control your laser cutter effectively:
Laser Control Commands
Turn Laser On/Off:
M3 S0.5    ; Turn laser on at 50% power (S value 0.0 to 1.0)
M5         ; Turn laser off
Movement with Laser:
G0 X10 Y10      ; Rapid move to position (laser automatically off during G0)
G1 X50 Y50 S0.8 ; Linear move with laser at 80% power
G1 X100 F3000   ; Linear move at 3000mm/min feed rate (laser power unchanged)
Practical Examples
Cut a 50mm square at 60% power:
G28              ; Home all axes
G0 X10 Y10       ; Move to start position (laser off)
M3 S0.6          ; Set laser to 60% power
G1 X60 F1200     ; Cut right edge at 1200mm/min
G1 Y60           ; Cut top edge
G1 X10           ; Cut left edge
G1 Y10           ; Cut bottom edge
M5               ; Turn laser off
Engrave a line with variable power:
G0 X0 Y0         ; Move to start
G1 X50 S0.3      ; Engrave at 30% power
G1 X100 S0.6     ; Continue at 60% power
M5               ; Turn laser off
Troubleshooting Common Issues
Laser Won’t Fire
Check Power Supply Connections:
- Verify all PSU connections are secure (G, P, L, IN, 5V)
- Ensure door switch and laser switch conditions are satisfied
- Test with manual fire button if available
- Verify level shifter is working (check 5V output with multimeter)
Check Smoothie Configuration:
- Confirm
laser_module_enableis set totrue - Verify correct PWM pin (
2.5 or other PWM-capable pin) - Check if pin needs inversion (
!symbol) - try toggling this - Test with manual G-code:
M3 S1.0thenM5
Check Wiring:
- Verify Pin
2.5 output voltage with multimeter - Ensure level shifter is properly powered
- Check for loose connections at PSU terminals
Inconsistent Laser Power
Symptoms: Laser power varies unexpectedly or doesn’t match S values
Solutions:
- Check
laser_module_maximum_powersetting (should be 1.0 for full range) - Verify
laser_module_pwm_periodis appropriate (20 microseconds typical) - Ensure your G-code includes S values in moves (
G1 X10 Y10 S0.5) - Check PSU potentiometer setting if equipped
- Verify clean 5V signal from level shifter
Positioning Errors
Steps per mm calibration:
- Cut test lines (100mm in X and Y directions)
- Measure actual distance with calipers
- Calculate new steps:
new_steps = current_steps * (desired_mm / actual_mm) - Example: If 100mm commanded gives 95mm actual:
157.575 * (100/95) = 165.868
Motor current issues:
- If motors skip steps: increase current (but stay below motor rating)
- If motors run hot: decrease current slightly
- Check motor datasheet for maximum current rating
Network Connection Issues
Can’t connect to board:
- Verify network cable is connected
- Check if DHCP assigned IP (view on LCD if installed)
- Try manual IP configuration in config file
- Ping the hostname:
ping SmoothK40(or whatever you set) - Check router’s DHCP client list
Slow or dropped connections:
- Ensure Ethernet cable is CAT5e or better
- Check for EMI interference (route network cable away from stepper wires)
- Verify router/switch supports the connection speed
Stepper Motor Problems
Motors won’t move:
- Check enable pins are set correctly
- Verify motor current is not too low (minimum 0.3A for most motors)
- Test motors individually with jog commands
- Check wiring matches motor coil pairs
Motors vibrate but don’t turn:
- Incorrect wiring (swap one coil pair)
- Current too low or too high
- Microstepping configuration issue
Endstop Issues
Endstops not triggering:
- Test endstop continuity with multimeter
- Verify correct pin configuration in config
- Check if endstop needs pull-up resistor
- Try inverting endstop pin with
!
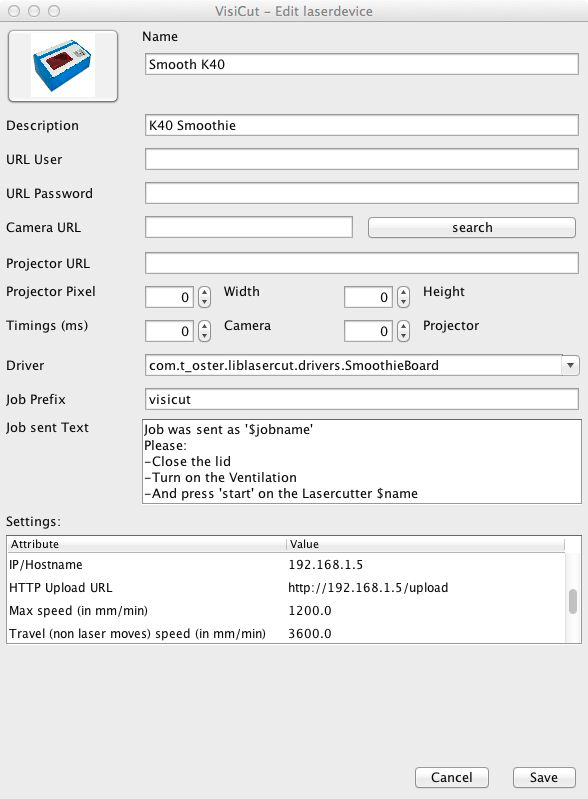
Software
VisiCut (Ethernet only with beta version 1.7.290 sept 2015)
Download the latest (Smoothie tab for dev. version) Visicut Download
Select menu Option, manage laser cutter, choose smoothie, fill your settings in.
You are done ;-))
Fusion 360
Works with Smoothie in USB.
Free for non-professional use.
Community Resources
Join and comments on the G+ K40 User’s community
Thank you for reading.